For my non-Lord of Ultima readers, Lord of Ultima is a browser-based empire building game that steals a lot of the same dynamics from the real world of global strategy and politics and smashes it into a browser-based, empire-building, massively multiplayer, online, long-term, real time strategy game. I am playing through this game, as a leader of an alliance, as this grants me some valuable experience in leading large groups of people, and learning how to drive people towards a goal without dissolution of the team.
Starting Out
Welcome, my lord, to the world of Caledonia, where we all seek to become the lords of Ultima. Lord of Ultima places you in a small village to start out with, and it lies upon your shoulders to grow your little village into a mighty empire that spans the world. How do you do that you say? Well, let me tell you how to go about this. Once you have finished untwisting yourself from the caressing hands of the wicked, tutorial mistress, your true reign begins.
I have a city?
Your first city will start out in a random location on a random, low-population continent in the world that you have chosen to play. Your city will start out with some randomized arrangment of resources that you will be able to leverage to grow your little city into a modest earldom. You will see an example of a typical city resource node layout.

Your Town Hall starts out with 300 wood production per hour, as well as 100% construction speed. Some properties of your city are worth being noted. First, your city can contain a maximum of ten buildings per Town Hall level, up to a maximum of 100 buildings in your city. Every building in the city has a maximum level of 10. The city is subdivided into five subsections, four of which are of identical proportions (unless you start on a river or ocean). The entire city is subdivided into plots upon which you can build various buildings, 68 plots in the central area of your city and 56 plots for each of the four quadrants around the middle (except for water cities). A water city will always have a small inlet in the lower right corner of your city. All water cities have this exact arrangement, regardless of the position in the Region view. Only cities that are laterally adjacent to river or ocean are water cities; being on an outside diagonal corner of a river is not a water location. Back in the city view, you will see the various resource nodes scattered throughout your city, including forest, stone, iron, and lakes. The forest plots will yield extra wood to any Wood-cutter's Huts placed in any of the eight quadrants surrounding the forest plot by +50% multiplier on the buildings base production for the first forest, and +40% for any additional forests touching the same Wood-cutter's Hut. The other resource nodes (except lakes) follow the exact same pattern, yielding +50% extra production for the first node touching the resource production building and +40% for any additional resource nodes. The lake nodes will always provide a +50% bonus no matter how many of them are touching a single Farm. The Farms also include their own field resource nodes, which act like the normal resource nodes for farms, adding +50% for the first and +40% for every additional field. Farm construction will automatically place a field resource nodes in every vacant adjacent plot.
Managing your first city
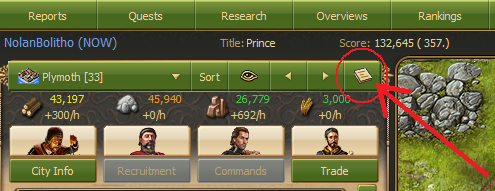
In order to grow your city, you need to boost your resource production, starting with wood. Before beginning to build on your city though, a little planning never hurts. There are a couple of ways that you can plan your city ahead of time. The game includes a link to a non-affiliated site that will allow you to plan your city yourself or to allow an auto-city planner to lay it out for you. Either way, you will need to view the City Planner in order to facilitate your planning efforts. You can access the City Planner from the little notepad button to the right of your city name at the top of the main control panel on the left, as shown below. If you access the City Planner while you are in City view, it will automatically populate the City Planner with your resource nodes.
In order to place buildings into the city planner, you can click on specific plots and select a building from the list that appears, or you can click on the plot and use the hotkey at the bottom of the City Planner page. It should be noted that the City Planner assumes that all buildings in your city are level 10, so the resource production totals, construction speed, troop strength, and recruit percent speeds are all for level 10 buildings. There are three primary types of city plans, resource cities, defense cities, and castle cities. Each of them have a considerably different layout. Your first city will need to be a mostly resource city, with a few minor modifications.
Each of the buildings serves a different purpose as is detailed in the LoU wiki.
- Town Hall
- Woodcutter's Hut
- Cottage
- Warehouse
- Stone Quarry
- Hideout
- Farm
- Iron Mine
- Townhouse
- Marketplace
- Harbor
- Sawmill
- Stonemason
- Mill
- Foundry
- City Wall
- City Guard House
- Barracks
- Training Ground
- Stable
- Moonglow Tower
- Castle
- Trinsic Temple
- Workshop
- Shipyard
The resource production buildings are the first buildings that you should place in your city planner. Every resource production building that you place needs to be touching at least one resource node of the appropriate type in order to gain increased output. Likewise, every resource production building should be touching one resource refinery. The resource refineries include the Sawmill, Stonemason, Foundry, and the Mill. The most efficient design will have the maximum number of resource buildings using the same resource refinery, as a single refinery will grant the same production bonus to every adjacent resource production building. From there you can add cottages to increase resource production, as a level 10 cottage will increase the resource production of all adjacent resource buildings by +30% labelled as a "Man-power Bonus". A good placement scheme involves placing resource production buildings in all adjacent, vacant plots to resource node groups of more than one node, starting with wood, then stone, iron. You can then replace the most centralized resource production buildings with resource refineries or place a refinery where it will have access to three or more production buildings. You can then delete any resource production buildings that are not touching resource refineries. You can then place cottages in plots where they will have two to three adjacent resource production buildings. At this point, you will probably have a negative value for your maximum buildings for your city. You can begin deleting resource production buildings that are only touching one resource node, until you have ten to fifteen free building slots in your city. You will need to put two to three farms and a mill in your city somewhere to provide food for research and new city placement. Choose the most open location in your city that has a lake or two, you can clear excess resource nodes of other resource types in the area if you need to. Then in order to be able to plant new cities, you will need to place a Moonglow Tower, one Barracks, Trinsic Temple, and at least two market places (or two harbors). You will also want to place three to six Townhouses adjacent to your marketplaces (or harbors) in order to begin providing gold for your research.
Auto-city Planner
If you do not feel like planning the city yourself, there are several auto-city planners that you can use to plan the city for you. The two primary auto-city planners that you can use, are listed below:
The first is a purely text-based optimization tool, while the second contains a graphical user interface. In either case, you will need to copy the URL from your city in the City Planner (usually something like: http://www.lou-fcp.co.uk/map.php?map=W00000D000B...), and paste the url into the white box in the first auto-city planner or into the white box presented to you after click "Import/Export" on the graphical auto-city planner. Despite the prettiness of the graphical auto-city planner, the text-based one does more efficient optimization, so I will continue explaining the text-based, auto-city planner.
Once you have the link input in the white box on the auto-city planner page, you will be able to enter the specific parameters that will govern the city planner's optimization process.
Let's go over the basic parameters:
use_slots=(1-100)This parameter basically determines how many resource buildings you want to auto-position.
You can place a total of 100, but because this tool only places resource buildings (the
gatherer (ie. Woodcutter), the refiner (ie. Sawmill) and Cottages) if you want a Moonglow
Tower, Warehouses, Markets etc you need to reserve space for them by specifying a
number less than 100.
num_cottages=(1-100)Somewhat self explanatory. Since the "use_slot=" does add cottages, here you can specify
how many you want. If you do not use this argument (i.e. use default of 12), simply leave this command out.
keep_extra_res_nodes=(0/1)This parameter just tells the program not to delete the additional resource nodes in the city.
Can be useful to help situate things once you build the actual city.
clear_buildings=(0/1)Setting this option to 1 will clear out any existing building before (but keep the nodes)
before starting to place buildings. Otherwise existing building will be kept. This is useful if you
grab a lawless city and want to clean it up and run it through the planner.
build_on_nrs=(0/1)Will tell the planner to build on top of existing nodes if set to 1. Will build around them if 0.
This would mean not having to destroy nodes to place buildings but will likely reduce efficiency.
I have done multiple resource cities, and usually the WSI ones have less than 10 nodes to clear
to maximize them. It is not a bad trade-off. Since each node destruction takes 2 hours, 20 hours is a reasonable time expense to gain an extra 5-15k resources per hour from the city.
placement_schedule=WSIF+(,[WSIF]+)*This is the complicated parameter that scares off everyone. It is actually very easy to use for
simple things. For example if you want a Food city just do =F and that's it (except don't because the optimization is bad for food cities). If you want a balanced city based on the resource nodes you have just do =WSIF. You can specify any combination of WSIF to make the planner spit out a city producing those resources.
So an example to help clarify. This is what you would put directly in the text box:
http://www.lou-fcp.co.uk/map.php?map=W00C0A00BBOAL3BD00Z400033223BB0000OM4C00BLAKBBO00D03344C0033A2244C003LBOCAOMCC003B30O00004CC400BB03B3O0D0C4M00000LBB3LZ000C4OB000033B3O4CC0C00BOBBK0OMCCK2A0002224440C000AAA00AAAAOCCC00BB00A0O2A2444B000000002K2OM0000AD00B00000000050B0C0A002BZ0000000000C0AAA2K2T0000D00000PRO2A2JT00000000WD0A00J0
use_slots=95
num_cottages=16
keep_extra_res_nodes=1
placement_schedule=WSI
Once you have a city plan in place, copy the Short URL and mail it to yourself in game for future reference, or Print Screen, and paste the city image into a paint and save it as an image file, in case you have two monitors to display on.
Building up your first city
Once you get your city layout planned, you can begin to put in buildings at level 1, and upgrade them. You will want to upgrade your Town Hall of level 3 or 4 initially, then begin putting in Woodcutter Huts where your plan has them laid out. Once you have your wood production up to around 1,000 -- 2,000 wood/hr you will be able to put Stone Quarries in, according to your city plan. When your stone production reaches 1,000 -- 1,500 stone/hr, you can begin placing your Iron Mines and Farms.
NOTE: This is where the design of a city for a player that uses the "Trade Minister" in game, and a player that does not, begins to vary. A player that uses a trade minister, can get away with having zero extra warehouses in their resource city and enough marketplaces to keep the resources constantly flowing to a main hub city. Conversely, a player that does not use minsters, must maintain enough storage and shipping according to how much time they can invest in the game. From this point on in this guide, I will presume that you are using Ministers, since, once you get past 50-100 cities, this game is nearly unplayable from a time-commitment standpoint without them.You do not need to worry about troops initially, since the probability of you being attacked early on is very slim.. Also, only people that have castles can attack you, and they can only do scouting and plundering attacks against you. The best defense against plundering is a Moonglow Tower to purify all of your resources just prior to the attacker's arrival, since plundering armies cannot capture purified resources or gold from you.
Additionally, you must have one barracks, two marketplaces (or harbors), and one Trinsic Temple, and Moonglow Tower to send out barons with in order to found new cities.
Research & Founding additional towns
Once you get a level 10 Moonglow Tower, you will be able to begin conducting research. The first research that you will want to complete is the first level of title research "Baron". This research will allow you to recruit a Baron unit at your level 10 Trinsic Temple. The barons will serve as a mayors for each of your future towns. For each new town that you found, you willl need an addional baron. Each new baron will require you to research an additional level of title research to control. You will want your second town to be another mixed resource city, in order to augment your original city. Follow all of the same procedures for your first city, except that you do not need a Trinsic Temple or a Barracks.
When you are founding new towns, it is important that you found cities in areas that will give you optimal resource node layouts in your new towns. Each city in the Region view will have eight quadrants around it, filled with one of five different terrain features: forest, hills, mountains, field, or ocean. Any adjacent forests will mean that your city will have additional forest nodes in the city view when you found it. Similarly, hills will provide extra stone nodes, mountains extra iron nodes, and fields and oceans provide extra lake nodes. You want to found a city surrounded by as many of the specific resource type that you want in your new city, as this will help increase the maximum resource production of your future city.
A final and absolutely crucial note about resource cities: You should always aim to have any singular resource city output between 70,000 and 160,000 resources per hour. Don't build a non-food resource city if it produces less than 70,000 resources per hour in total. Similarly, don't build a food city if it does not produce more than 120,000 food per hour. It will hurt you considerably in the long run, and you would be better off building a military city in that location in the world.
Food city
By now, you will want to invest the time and resources to build a food city. These cities consist of considerable time costs up front, but they are absolutely essential in the long run. The reason for the extreme time cost, is due to the fact the you must remove every non-lake resource node from your city. Once all of the other resource nodes are gone, you can build up your food city using this basic layout and simply adjusting farms around a little to make good use of the available lakes and filling in extra farms for the extra buildings.

An important note to make, is that you need roughly one food city for every three or four castles that you possess. This will obviously not be enough food to feed all of your troops, but you will have hubs for storage of extra resources for use when your armies are attacking or defending, instead of raiding dungeons.
Fourth City - Defense City Layout
For your fourth city, you will probably want to get a berserker raiding city. This city follows the defense city format. This will require you to ship lots of resources into the city, since it will have no resource production of it's own, except for food. At that point, you need to find the optimal combination of Barracks and Training Grounds in order to produce the highest Troop Strength (TS) and highest recruit speed percentage. A good goal to shoot for is 65,000-80,000 Troop Strength with 5800% or higher recruit speed for the Training Grounds. This will allow you recruit one Berserker every three seconds. You can use this spreadsheet to predict your final recruit speed: GoogleDocs Recruit Speed Spreadsheet.
Additionally, you will want to ensure that your food city ships enough food to your berserker city. One final note, you will also want to include a warehouse, a mill, and a marketplace or two (depending on how far this city is from your hub) for shipping all of the loot that you will collect from dungeons back to your main hub city.
When you have trained enough berserkers in your raiding city, you can begin to raid dungeons. The number of berserkers required for each level of dungeon is tabulated below:
Dungeon Level: # of Berserkers Suggested:
1 15
2 98
3 458
4 1,549
5 3,400
6 >5,500-6,500
7 >12-14k
8 >20k
9 >35k
10 >60k
When raiding, I always gauge the number of units necessary to carry back all of the loot. For a level 8 dungeon, you need around ~40k berserkers to carry back all of the loot from a 99% dungeon. From a level 9, you will want to send ~80k berserkers. For a level 10 dungeon, you will want to send in around ~144k berserkers, in order to bring back all of the loot from a 99% complete level 10 dungeon. It would be good to note that the completion level of the dungeon influences the amount of resources that can be carried back from the dungeon. As such, for a 1% complete dungeon, the numbers that I just listed above are massive overkill, and you will have tons of empty bags, but I like to set my raiders on auto (thanks to the War Minister) and let them go at it.
I created another table to determine the optimal setup for troop numbers to carry back 100% of the resources from any single dungeon with minimal changing of the raids for the War Minister. Below is tabulated the optimal numbers for raiding dungeons and being able to carry back all of the loot. These numbers are generalized for attacking the non-optimal dungeons with your troop types (e.g. paladins attacking Mountain dungeons or Berserker/Guardians attacking Forest or Hill dungeons).

Once your alliance secures relative domination of a continent, it is a good idea to castle all of your defense and raiding cities in order to increase the yield capacity of each individual city.
A Castle city
When you have several defense cities, filled with rangers, guardians and templars, you can begin to consider building a castle city. Building a castle is a momentous undertaking, and it entails additional risks that are not an issue for a non-castled city. The types of attacks that can be performed upon castles is in much greater variety than those that can be performed upon regular cities. It is important to note that a castle city, set to raid dungeons, via the War Minister, will produce roughly 12-16 times as many resources per hour as a resource city. Similarly, a non-castled military city will produce roughly 4 times as many resources per hour as a resource city.
The types of attacks are detailed below:
[Scout] -- Uses Scouts to attempt to gather information on another city. Anyone can be Scouted, including non-castled cities, but you must have a castle to do the Scouting.
[Plunder] -- Plundering is used to loot resources from other cities. Anyone can be Plundered, including non-castled cities, but you must have a castle to do the Plundering. In a plunder, the defender will suffer limited casualties.
[Assault] -- An Assault is a single attack that focuses on dealing damage to a city and its units. The attacking force is sent out once, attacks the target city, and any surviving units return home. Only cities with a castle can Assault and be Assaulted.
[Siege] -- A Siege is a prolonged series of attacks on a city. The troops you send out will continue to attack the city in hourly waves until destroyed or recalled. Each wave deals 1/5 of the damage an assault would deal both to the attacker and the defender. Only cities with a castle can Siege and be Sieged. Sieging is also the command that allows you to take over a castled city when you have a Baron in the attacking force. In order to conquer any city, one must add a Baron to the sieging force. This also applies to castled Lawless Cities.
A castle city will never have any farms for feeding the troops, since it would take most of your building spaces in order to build enough farms to feed all of the troops contained within. Instead, it is most advantageous to build a food city nearby to your castle, and simply ship and store the massive amounts of food that you will need to feed your dread armies. It is recommended that you have 2-5 million food storage in a castle, such that you can feed troops for several hours without resupply. If you have support troops at your castle, then it is important to note that your support troops will eat their home city's food under normal circumstances, however they will eat the host castle's food if that castle is under siege. This the primary reason for possessing vast food storages. Fortunately, you are allowed to ship food in continuously while you are under siege, so you will never have to worry about your troops starving, unless you cannot ship food in fast enough.
By now, you will be well on your way to building a world-spanning empire, and should be able to continue to expand your empire. The most important point to keep in mind is to keep ahead of your resource needs. As you begin recruiting massive armies, your iron and gold needs will skyrocket, so having iron and gold cities are essential to your ability to successfully execute wars in the future. Also, it is highly advantageous to join an alliance, such that you can begin to collectively form a solid power base in your little region of the world.
Castle city design
There are a nearly infinite number of ways to design a good castle; but, in the interest of not ruining the game for you, I will simply list stats of 'well-designed' castles from my experience:

One way to compare castle designs is to take the total troop strength (TS), and divide by the particular unit recruitment time. This is only valid for castles of the same unit type though. It should be noted, however, that this comparison favors extremely low recruitment times, which is not always the best arrangement for castles.
It should be noted that all castles should only contain one type of troop production building. The reason for this is efficiency. A castle must be optimized to maximize total troop strength while still minimizing the recruitment speed of the troops contained therein. If you split up the troop type production buildings, then you introduce incredible gains to your recruitment times. So, instead of having 232,000 mages recruited in 5-seconds each, you get 116,000 mages recruited in 15-seconds, and 116,000 berserkers recruited in 8-seconds. This is a completely unsuitable arrangement for effective combat, as it will require weeks for you to replace your full castle TS. It is also important to note that the troop's recruit times are rounded down, so the most efficient castle designed for a specific troop type will have X.49 for the recruitment time of the troop type of interest (with X being an integer from 0 to N; with N being as small as possible).
A critically important factor in castle design is the number of support buildings that you choose to have in your design. Every single support building means that you lose 4,000 troop strength. Generally, a good set of support buildings includes two warehouses, one mill, and two marketplaces. For castles that are intended for raiding, more marketplaces and an additional warehouse are recommended in order to allow you to ship resources out more quickly and efficiently. If you use castles and military cities for raiding, you need enough markets to keep the warehouses free to receive more from incoming raid parties. It is a good idea to keep around 300k-600k of space in your storage for each resource, with enough shipping to get those resources to your hub before the next raid party arrives. If you are concerned about not being able to ship out quickly enough, put a Moonglow Tower in each of your castles as a support building to allow you to purify any excesses.
I have done some work in the area of raiding castles, in order to determine just how many marketplaces you need in order to ship all of the goodies that you bring home from dungeons back to a central hub. I came up with this somewhat generalized chart based on average values for resource hauls for level 9 and level 10 dungeons. The "Fields away" column is how many fields away from your hub your raiding castle is. The underlying assumption is 4 raids on a level 9 dungeon bringing back 100% of the resources or 2 raids on a level 10 dungeon bringing back 100% of the resources.

In my experience, it is optimal to possess very low recruitment times for purely offensive castles, moderate for offense/raiding castles, and moderate to high recruitment times for defensive/raiding castles.
What about Traps and Towers?
Firstly, you must have Scout Towers. For continental castles (those that do not have access to water) you realistically only need two Scout Towers, since that gives you 24 hours of forewarning, which covers troops launched from almost anywhere on the continent. For naval castles (those that do have access to the water), you must have at least four Scout Towers, but probably no more than six.
As for the other traps and towers, these are one of the most significantly insignificant parts of the Lord of Ultima. They are useful for the first few months of the game, after which they are largely irrelevant (except in terms of controlling palace enlightenment, covered later). Each trap only traps a maximum of 1,000 troop strength up to a maximum of 50% of the attacking troop strength. If you read the optimal castle numbers above, you will know that if you have your castle's outer wall 100% traps, then you will (at best) be able to contain 16,000 TS worth of enemies. When compared to a 'half-decent' castle design (say, 200,000 TS) this is a meager 8% of your enemies attackers. It is much more useful (though still very meager) to use Towers to defend your castle. Each tower provides "Fortification" for anywhere from 2,000 to 2,500 of your defensive TS. This includes any troops supporting your castles from abroad. In my opinion, it is always better to kill your opponent as much as possible than to allow them to come back for a second try. Also, towers are more general, in that they do not depend on what your opponent sends to attack you.
The only trap that might be vaguely useful is the "Camouflage Trap". The reasoning for this is not for effectiveness, because building towers will always result in greater combat advantage than building traps, but for economic reasons. It is infinitely more costly (both in time and resources) to be forced to rebuild a castle, than to simply retrain troops. Due to this, the 'Camouflage Traps' are useful, in that they are directly geared towards neutralizing artillery (catapults, rams, and war galleons), thereby reducing the potential for damage to your cities from artillery. If you implement a half-decent resource shipping infrastructure though, the resource cost of building castles is trivialized, leaving you only with the time cost.
Alliances
At this point in the game, you must join an alliance to begin to exert any type of influence on the world around you. I am only going to speak briefly about alliances, since every alliance that you will join will have a different philosophy and approach to winning. Be a team player, don't back-stab your alliance mates, and be honorable.
Running a World-spanning Empire
As you begin building up a continental empire, you need to begin thinking about how to ensure that resources are in ample supply at all parts of your empire at all times. This goal will require a distributed resource infrastructure consisting of storage and relay hubs in order to supply all of your castles with resources in a timely fashion.
There are a couple of key research topics that will assist this process very succinctly, the first of which is the "Carts: Travel Speed" research. This will decrease the amount of time that it takes your merchant carts to travel in between your cities, thus allowing you to place them farther apart, thereby allowing you to exert more influence over a broader area of the continent that you start on.
As for the design of your hub cities, you need design a specific number of carts into your cities to maintain your relay hub cities resources based on maximum usage. In my experience, you need roughly two Marketplaces for every castle that you are supporting. Depending on how far your relay hubs are from your primary hub(s), you will need around 4-8 million storage capacity of every resource, in order for the Trade Minister to keep enough resources on hand to not cause shortages.
Similarly, you need to possess enough storage in your main hub(s) to feed every one of your troops for about one to two days. This extra back log of food will allow you to conduct massive military operations without compromising the integrity of your armies. Based on my current numbers, I need to have around 100-150 mil food in long-term storage for short term military campaigns. It is crucial, somewhat obviously, that you must send your troops raiding again, as soon as they return from military attacks.
Below is an Infrastructure plan that I have executed, and a plan for an empire in the next world that we settle on.

Current Infrastructure for a single continent
This infrastructure works, but it is not nearly as efficient as I should like it to be. Firstly, my primary hub needs immensely more storage than it has, and I need to more centrally locate my primary hub in order to reduce the dependence on the trade cart speed research.
For my next empire, I am planning on using four centrally located primary continental hubs, that will each feed four relay hubs, one in each quadrant of the continent. This will allow me to setup a military presence on every corner of the continent, and thus project power and protect allies against attack across a broader area more easily. Each of these four hubs will be linked to one another such that resources shipped in from the relay hubs will be able to be shared between all four quadrants of the continent. This will help to reduce wartime dependence on resource cities, and thus allow my empire to support more castles than my current empire does. Between the four hubs, I am planning on possessing roughly 100 million wood, 100 million stone, 60 million iron, and 120 million food storage, which would be sufficient to supply my entire continental empire's needs for roughly 1-2 days. The immense storage capacity would allow me to absorb short term shortages, simply by virtue of having massive quantities of resources on hand. This, in turn, will allow my empire to support more castles, per city and enable me to exert an increased influence militarily over the continent. Since the primary means of control in this game is military domination of a continent, it is wise to be capable of supporting as many soldiers as possible for a given economic infrastructure. Given the fact that military castles that are assigned to raiding are about ten times more productive than the most efficient resource city, it is beneficial to possess large numbers of military castles, such that you are not required to use all of them simultaneously for any given military action.
Below is an Infrastructure concept for a continental empire using back-haul hubs. The advantage of this setup, over the four main hub setup, is the increased capacity for inter-continental shipping, but it would limit the total storage on a single continent. All of the links displayed would be two-way connections. Perhaps, it would be advantageous to combine these two infrastructural designs, while still limiting the number of cities devoted to shipping.

Infrastructure Plan A
The second idea for resource management hub network includes a central system of nine hubs each designated for a specific purpose set. The three types of hubs in the central core would be the Continental Hub, the Long-term Storage Hub, and the Palace Hub. Additionally, there will be four Relay hubs at strategic locations around the continent to provide ample resources to every city and castle on various corners of the continent.

Infrastructure Plan B
The Continental hub (marked by a 'C' on the plan above), would be a primary storage and shipping to the possessing a city layout like below:

Continental Hub
The continental hubs will serve as the primary conduit for resources to flow into and out of the central storage set of hub cities. The 6,200 trade carts will allow the hub to share resources with the three other Continental hubs, and with it's designated Relay hub. Each Continental hub will be connected directly to a single Relay hub which will feed the all of the castles and cities in a single quadrant of the continent.

Long-term Storage Hub
The Long-term Storage hub (marked by an 'L' on the plan) is the second type of hub in the central core. The Long-term hubs will serve as a storehouse for vast quantities of resources in order to eat up short-term shortages, in the event of large-scale military operations. These hubs will share amongst each other and will feed the final type of hub city in the central cluster, the Palace hubs. Also, it should be noted that these hubs will be the primary resource purifying locations as well, in order to allow the primary Continental hubs to maintain optimal liquidity of resource-sharing.

Palace Shipping Hub
The Palace Shipping hub (denoted by a 'P' on the plan) will serve as the primary feed for all alliance-built palaces on any militarily-dominated continents. The Palace Shipping hubs will be directly fed by the Long-term Storage hubs, and will be capable of shipping out 8 million wood and 8 million stone in a single shipment. Since the hub cluster will be centrally-located on the continent, it is expected that one can ship out two full shipments per day to each palace, totaling 64 million resources contributed per day.

Relay Hub
The primary advantage of Infrastructure Plan B is the massive amounts of storage that are located in the center of the continent. This massive store will enable the empire to absorb short-term (roughly 1-2 days) of complete resource starvation and still be able to function at 100% efficiency. Based on past experience, there is rarely a time where all of your castles will be involved in military operations, so the likelihood of complete resource starvation is very low, making this the most effective means of producing resources on an enormous scale. If you are still feeling skittish, I would recommend throwing food cities (or non-castled, military raiding cities) up around your main central cluster of hubs in order to provide a non-military-dependent food supply.
The other side effect of the above advantage is that it will allow you to alter the ratio of resource cities to military/castle cities. Without the massive storage, a constant influx of resources from resource cities is needed to maintain production capacity at all of your castles, but with the ability to absorb short-term shortages, you can have 75-90% of your cities be military cities or castles, thus allowing you to markedly increase your total empire resource production.
Warfare
At this point in the game, you should be bumping into other members of your world, in a not-so-friendly manner for some. Warfare in Lord of Ultima, depends much more heavily upon knowing yourself and your opponent than it does upon understanding the fundamental mechanics of the game itself. For example, one of the first pieces of knowledge that you need from your opponent is what timezone of the world that they live in. This may seem like trite and unnecessary knowledge, but when combined with a few basic assumptions (for example, your opponent must sleep at the 'normal' hours for their timezone, and they very likely have a job). You can leverage this knowledge against them, by directing your soldiers to attack only during certain times of day.
I will briefly cover three main areas of combat in LoU; attacking, defending, and knowing.
Attacking
When attacking in Lord of Ultima, there are a few basic strategies that you must follow to be even remotely successful against a skilled opponent. Firstly, you must cement the idea of issuing fake attacks into your head. A "fake attack" consists of an attack that sends the minimum amount of troop strength (usually 2,500 to 3,000 TS) to attack a target. Why would you do this, you ask? Say your enemy has 300,000 defensive troop strength in the area of the castle that you want to attack. Also, presume that he has 2 other nearby castles. If you simply attack his castle with yours, you will be fighting all 300,000 of his troops in one go. However, if you send 3,000 troops to attack his other two castles, he will not know which one is the "real" target until your troops actually land the attack. As such, he will be forced to distribute his defenses accordingly, and you will only be fighting 100,000 troops instead of the full 300,000. The rest of attacking in Lord of Ultima is all leveraging time, space, and knowledge of your opponent to your advantage.
Defending
The key to defending yourself in LoU is two-fold, first not defending that which you do not have to and second is fluidity. If you can devote your defenses to only the cities which need defending (i.e. castles), and be able to move your defensive troops around quickly and easily, then you will be successful in defending yourself against all but the most ridiculous odds.
Knowing
The knowledge aspect of combat in LoU is the most important one. I will only mention three dimensions of knowledge that you need to have some mastery of to succeed in LoU. First, you need to know your enemy's capability, and of utmost importance is knowing how quickly they can recruit troops. Second, you need to know your enemies habits such that you can leverage those habits to his downfall. Third, you need to watch the overall capability of your enemy, such as the number of castles that they have, the number of resource cities, etc, such that you can find and exploit weaknesses in their economic or military setup.
Moongates
Recently, the world of LoU had a massive shift in the fundamental workings of the game. I have not published yet on this since I did not have a good chance to master it. The moongates, currently, only open for 24 hours once every two weeks at a randomized time during the week. Attacking or defending through moongates requires that you have 'moonstones' to send your troops through, one moonstone per troop strength. The attacking through moongates also applies an attack power penalty based on distance traveled to and from the moongate that is similar to night protection and maxes out at -50%. Currently, only one moongate on each continent opens during the moongate cycle, and troops can travel between any of the moongates allowing you to attack a single castle with an entire world's worth of offensive units. As such, it is now required that an alliance possess in excess of 50-100 mil defensive TS on each continent in order to stack in palaces.
Palaces
By now, your world-spanning, butt-kicking empire of goodness should be well established and flourishing. So, how does one go about winning Lord of Ultima, you ask? Well, this is where palaces come into the game. Palaces are unique buildings that can be constructed in castles that become enlightened by nearby shrines. They cost obscene amounts of resources to build, but your entire alliance can help in this process. What are the costs of palaces? Each palace costs both wood and stone to construct, as shown below.

Palace Costs
But, I cannot store that many resources in my city though, you say! Well, fortunately, you do not have to. All wood and stone shipments that are sent to palaces can be earmarked as "Palace Shipments" meaning they do directly into that particular castle's stockpile of resources that are dedicated to the palace. It is important to note that the resources that are dedicated to the palace stay with the castle, whether the castle belongs to you or not. This is the prime reason for only building palaces on continents that your alliance dominates, as it is a sad day when you and your alliance lose all of the resources that you put into the palace. Another note is that palaces are destroyed when the castle changes hands. This includes changing alliances, as well as palaces being captured in sieges.
Once your alliance collectively possesses one level 10 palace from each of the eight primary virtues, you (and all of your alliance mates) will have won Lord of Ultima, and will receive crowns that you can carry forward into the next world.
Sources: Lord of Ultima wiki, personal experience
Phenomic is a horribly-run company, and the LoU forums are horribly-managed...I recommend that no one bother with this game.
ReplyDeleteAh, they seem to be getting better. I enjoy the game at least.
DeleteWell, the horribly run company is shutting down its servers and I have until May12 to finish this game.
DeleteEnjoy it while I can
Yea, but our game is getting along nicely. We will be posting our Kickstarter in a few months. This game will be a space-based game similar to LoU, except that we will actually be enforcing anti-cheating and anti-add-on rules.
DeleteThank you for your very comprehensive overview . Fun game !
ReplyDeleteYou are most welcome.
DeleteGreat guide, but you forget one thing. Without "cheats" is this game almost unplayable
DeleteCouldnt disagree more, theres no real "cheats" to start with. Theres a few add ons that only save you some clicking. Its a great little browser game and this is a very well done guide. Thanks Andrew for sharing it.
DeleteThere are not so much cheats, as there are add-ons that enhance the interoperability of alliances. The real cheating is political.
DeleteVery impressive guide. You have some nice techniques and critiques to the almost unreadable format the current wiki guide and in game tutorial gives us. I wish I had this guide a year ago. Thank you.
ReplyDeleteOne side note, if you could have touched on the importance of military over resource cities. A fully built military city will bring in MORE then any resource city could wish to, besides food cities. I know this was something I didn't know in the beginning and was essentially playing "farmville".
Yea, this guide does not cover all of the details regarding the optimal way to play, but it puts you on the right path.
DeleteYour guide is really terrible.
ReplyDeleteThat may be. It has not been updated in a very long time and is likely out of date now.
DeleteI disagree with the previous poster. This guide is great and helped me to a #1 crown. It is not all-inclusive so not for complete noobs, but a great guide nevertheless. Keep it up Andrew.
DeleteGlad that it helped someone. At the time, I was playing as a moderator against TDK. I have since quit Lord of Ultima, but it was a useful guide at the time, and it definitely works. I out-produced the top players at only half of their score.
DeleteI only scanned through some of this so far...The " Palace HUB " is not in proportion...32 warehouses are enough with 10 sawmills and 10 masons for storing over 26 million each wood and stone...MoonGlow is needed then the rest should be markets...Remember , each L-10 market carries 200 K...5 carry 1 mil...You want to send 6 mill or more per sending , which may vary from 40 minutes to 2 hours round trip , depending upon real estate availability when building the HUB. :) But good work fave...{ nlw343@gmail.com }...Don't be a stranger just because EA is pulling out in May....GREMBAR
ReplyDeleteThats 6 mil of " EACH " wood & stone :)...GREMBAR
DeleteAt the time that I wrote this, it was accurate. I don't really care if LoU goes away, I am building a replacement for it myself that will be far better.
DeleteLoU is being resurrected - Gaming Addict Studios, a group of developers and strategy gamers from around the world have come together to create a unique strategy MMO called Crown of the Gods™.
ReplyDeleteCrown of the Gods is past alpha testing and development is almost done, the current kickstarter has already met goal (to pay for the final artwork) and will go to beta in January 2015. The website, forums and chat are active.
https://www.kickstarter.com/projects/1160729494/crown-of-the-gods
If you look at it you will recognize a lot of things, only this is being developed by actual gamers who loved Lord of Ultima, so there will be improvements that EA never would add.
Pass the word to all the ex-players you know. We need to get the word out.
I am about 50% of the way done building a space-based version of LoU also. I am keeping it under wraps until it is ready though, before we burst onto the market.
DeleteYour game looks very much like LoU, whereas mine expands it out a good bit, and adds a lot of features.
I'd be interested in seeing your game when it's at Beta stage. What are you calling it? One of the most enjoyable parts of LoU was the teamwork and social interaction, so don't forget that aspect on your game. I'm playing Tribal Wars 2 right now and it just doesn't make it for me, there is little teamwork for the most part, and it's hard to connect with other players.
ReplyDeleteRight now Crown of the Gods is pretty rough as far as the artwork goes, that's being worked on right now because of the successful kickstart. I know that there are changes and additions to the basic LoU format, but a lot was left functionally the same so that the LoU information can be used. The whole idea was that a lot of us hated EA for killing the game, and wanted it back - and back with benefits is even better.
Send me an email at vanland -(at-) gmail -[dot-] com, and I will add you to the list of interested people. If you are on the dev team of that LoU clone, we will have a lot more to talk about.
Delete